This one is from 1920...
...back when men were men!
This one is some modern-day guys having fun!
Friday, September 10, 2010
Thursday, September 9, 2010
Mas progress...
I had some time this afternoon to do a little work on my project. As I've mentioned several times, I needed something to fill the area where the oil pump used to be on the turn-of-the-century board track racers. Well…I finally found something! I went to see my buddy Vic at The Rover Shoppe…he let me wander around a bit and within a few minutes I found it--a fan clutch out of an old Land Rover…perfect!
I spend some time drawing and subsequently cutting out a bracket to hold it. I need to weld in a couple of bracket to bolt it to the frame, but this is what it looks like right now…sans paint, etc., but you get the idea…


I have to make another bracket for the other side, weld on the brackets (like I mentioned before) and then install a shaft and gear for the chain that will run to it…yada yada… but at least it's taking shape!
I've also mentioned how I wasn't happy with the seat, so I fabricated a bracket and a way to mount it to the seat and the bike…looks nice and will support the back of the seat…


And then one other thing I was able to accomplish was to weld a tab to the frame to mount the chain tensioner. I had this bolt-on thing that looked like crap, so I cut it up and was able to use a piece of it to accomplish the mission. And actually, I was going to weld it, but Sergio (I was at his shop) welded it while I was working on my seat bracket. Thanks Sergio…but you only welded one side…now I got to weld the other!
So not much time, but it feels good to knock out a few piddly things.
Mas later…
I spend some time drawing and subsequently cutting out a bracket to hold it. I need to weld in a couple of bracket to bolt it to the frame, but this is what it looks like right now…sans paint, etc., but you get the idea…


I have to make another bracket for the other side, weld on the brackets (like I mentioned before) and then install a shaft and gear for the chain that will run to it…yada yada… but at least it's taking shape!
I've also mentioned how I wasn't happy with the seat, so I fabricated a bracket and a way to mount it to the seat and the bike…looks nice and will support the back of the seat…


And then one other thing I was able to accomplish was to weld a tab to the frame to mount the chain tensioner. I had this bolt-on thing that looked like crap, so I cut it up and was able to use a piece of it to accomplish the mission. And actually, I was going to weld it, but Sergio (I was at his shop) welded it while I was working on my seat bracket. Thanks Sergio…but you only welded one side…now I got to weld the other!
 |
| hmm...gonna need to clean up those welds :-) |
Mas later…
Monday, September 6, 2010
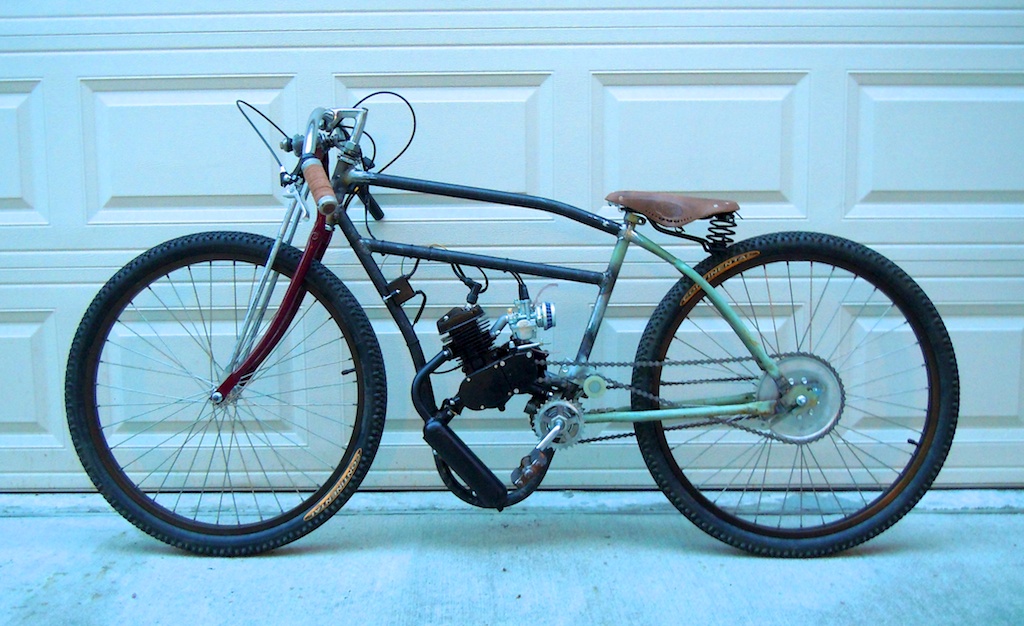
IT'S ALIVE!!!
I didn't plan on working a whole lot on the project today, but it was raining, so I piddled in the garage...
The first thing I did was to mount the tank to the frame. Here's the hardware I used...I lined the inside with rubber and used rubber washers on the tank...

I've got four brackets on the tank...this is what it looks like mounted on the bike...

Remember me saying I didn't like the way the seat looked on the bike...well I fixed it! I like this a lot better...

I'm going to fabricate some brackets to go from the seat stays to the bottom of the seat. It will look a lot like an Indian from the era, but I don't have the metal to make it right now...it can wait. But doesn't that look a lot nicer than before?
I guess you can see all the wiring and extra-long clutch cable flopping about in the picture right before the seat...so I went ahead and cleaned up all of that...

Muchas better!
After I checked to ensure all of the bolts were tight and double checked everything else, I put some fuel in the bike to see if it would start. The first thing I noticed was that I had a pinhole leak in the tank. I guess my welding isn't as good as I thought, but it wasn't too bad...I'll fix it later. So after dealing with that...I started up the bike and went for my very first ride on it! Omar was outside with his wife and kiddo...I gave him the camera to film the inaugural ride!
I was so fast I was a blur as I buzzed the tower!

And here's the bike after the ride!

I guess the pinhole leak in the tank was a little worse than I though...no problem...I'll fix it.
My first ride was awesome! I'm still grinning.
There's still a lot left to do. I did fix the seat, but I have to make some brackets for the rear of the seat. There's also a lot of little details, but the big thing is to fabricate an "oil pump" and finish my gas tank... and all the other yada yada I've mentioned before.
I'm pretty jazzed about the bike starting so easily and running so well. Super fun!
More later....
Sunday, September 5, 2010
It takes a lot longer to build a tank than I thought...
Mission accomplished, but it took a lot longer than I expected...


I started out by placing all of my templates onto the sheet metal and tracing them out...

Then with my cut-off wheel, I went to work...

Next I needed to mark out everything. I wanted to mount the tank to minimize external hardware, so I decided to weld some coupler nuts inside the tank so I could screw the tank to the frame in a more professional manner. Here's the layout of the six of them...

Then I screwed them to the sheet metal in preparation for welding...

Next I needed a gas cap. Since the tank that come in the kit had one, I decided to use it. Before...

After... :-)

Here's a few other views...


Here's what the coupler nuts look like welded onto the inside of the tank...

And here's yours truly welding and grinding the new tank...


So here's the tank on the bike...


It took a long time to build the tank, and when I was done... I was done! Clearly the tank needs more grinding and sanding, but it's all welded up. I'll pressure test it at some point in the next few days.
Aside from that, I still have a ton to do. I don't really like the way the seat is mounted to the bike; I'm going to do something different. I still need to clean up some wiring. I want to use copper line instead of rubber hose for the fuel line, so I got to figure that out. I also need to fabricate an "oil pump" and incorporate it into the design...and on and on...but I'm getting there...slowly...
I don't think I'll be working on it tomorrow, but I'll piddle a bit during the week...
That's all for now...
Saturday, September 4, 2010
A place to sit!
I got a little done today, but a lot of time was spent going here and there getting parts and whatnot...plus, I only wanted to spend part of the day on the project...the other part of the day is family time!
And by the way...I was able to get the right grip installed so that it controls the throttle. That was challenging...I though it would take about 20 minutes...an hour and a half later...UGH!
Anyway... today Sergio and I went to Triple S Steel and purchased some metal. I got some 18 gauge steel for building my fuel tank (it came in a 4' X 10" sheet, so I reckon I can screw up several times), and
Sergio got some tubing for his very own board track racer project. After loading the steel, we went to Cox Hardware and Lumber (only the greatest hardware store on the planet!) and purchased various bits and pieces for our projects. And we finally ended up at our friend Lance's shop--a warehouse where Lance lets Sergio keep some of his tools...and Lance is also kind enough to let his friends use the shop for random projects. Thanks Lance! By the time all the running around was done, it was lunch time, but I at least wanted to get the seat on the bike before calling it a day...
I got a couple of seat posts to accomplish the task...
And after some measuring and figuring, I proceeded to cut them into pieces :-)

I had to do some grinding here and there to get the angle just right. This (picture below) wasn't the final angle, but you can see where I was heading...

Once I got it right, Sergio stepped away from his bike and welded the two pieces together for me...

Here's the raw product product...

Here I am testing riding (pedaling) the bike with the seat installed...

Sergio even used my cell phone camera to record the first ride...
So here's where the bike is right now...

Tomorrow I've got big plans and should be able to get a lot done. Hopefully I'll have the fuel tank build (of course the welds will not be cleaned up until later), and I should be able to put fuel in the bike and take it out on the first ride. There's a lot of work between now and staring the motor. I have to tighten cables...clean up wiring...actually fabricate the tank and install it...yada yada...but I should be able to do it all tomorrow unless something goes wrong...which typically does...
Anyway, that's all for now...
...until tomorrow morning!
And by the way...I was able to get the right grip installed so that it controls the throttle. That was challenging...I though it would take about 20 minutes...an hour and a half later...UGH!
Anyway... today Sergio and I went to Triple S Steel and purchased some metal. I got some 18 gauge steel for building my fuel tank (it came in a 4' X 10" sheet, so I reckon I can screw up several times), and
 |
| Doesn't really look like a gas tank does it? :-) And, sorry about the picture quality...all we had was a cellphone camera...I forgot the digital camera... |
I got a couple of seat posts to accomplish the task...
 |

I had to do some grinding here and there to get the angle just right. This (picture below) wasn't the final angle, but you can see where I was heading...

Once I got it right, Sergio stepped away from his bike and welded the two pieces together for me...

Here's the raw product product...

Clearly the weld needs to be grinded and cleaned up...
...and the seatpost itself will be chromed by another buddy who owns a coating business...
...and I will also lower the nose of the seat a bit...
...and I'm also going to fab some brackets to attach to the back of the seat...
...and that seatpost clamp is not the one I'm using...I just forgot the bolt, so I used that quick release to get by...
...so over look all that for now...
:-)
Here I am testing riding (pedaling) the bike with the seat installed...

Sergio even used my cell phone camera to record the first ride...
So here's where the bike is right now...

Tomorrow I've got big plans and should be able to get a lot done. Hopefully I'll have the fuel tank build (of course the welds will not be cleaned up until later), and I should be able to put fuel in the bike and take it out on the first ride. There's a lot of work between now and staring the motor. I have to tighten cables...clean up wiring...actually fabricate the tank and install it...yada yada...but I should be able to do it all tomorrow unless something goes wrong...which typically does...
Anyway, that's all for now...
...until tomorrow morning!
Thursday, September 2, 2010
"Aged" Leather...
Well, look what showed up today! Clearly the new grips and seat aren't permanently mounted yet, but with them sitting in place...oh yeah...sexy!!!

So this weekend I don't know how much I will get done...probably small things that won't really make a huge visual impact, but I do love attention to detail! We'll see...
So this weekend I don't know how much I will get done...probably small things that won't really make a huge visual impact, but I do love attention to detail! We'll see...
Oil Pump?
Well...I found something...maybe. It's a high-dollar variable pitch sheave wheel from browning that has been discontinued...

I got it fo' next to nothing because it has been replaced by new version.
It's O.D. is 6.5 inches...should fit nicely and certainly looks the part... and maybe it combined with the other bits and pieces will work? (doesn't hurt to try I reckon.) It'll be here Tuesday.
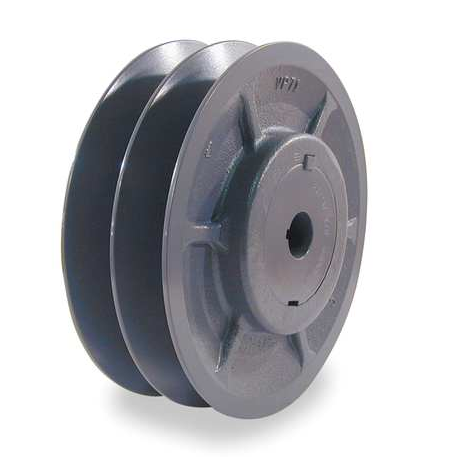
I got it fo' next to nothing because it has been replaced by new version.
It's O.D. is 6.5 inches...should fit nicely and certainly looks the part... and maybe it combined with the other bits and pieces will work? (doesn't hurt to try I reckon.) It'll be here Tuesday.
Subscribe to:
Comments (Atom)